Lifer Boss Battle Guide for Wuthering Waves
Author : Noah
Dec 08,2025
Quick Links
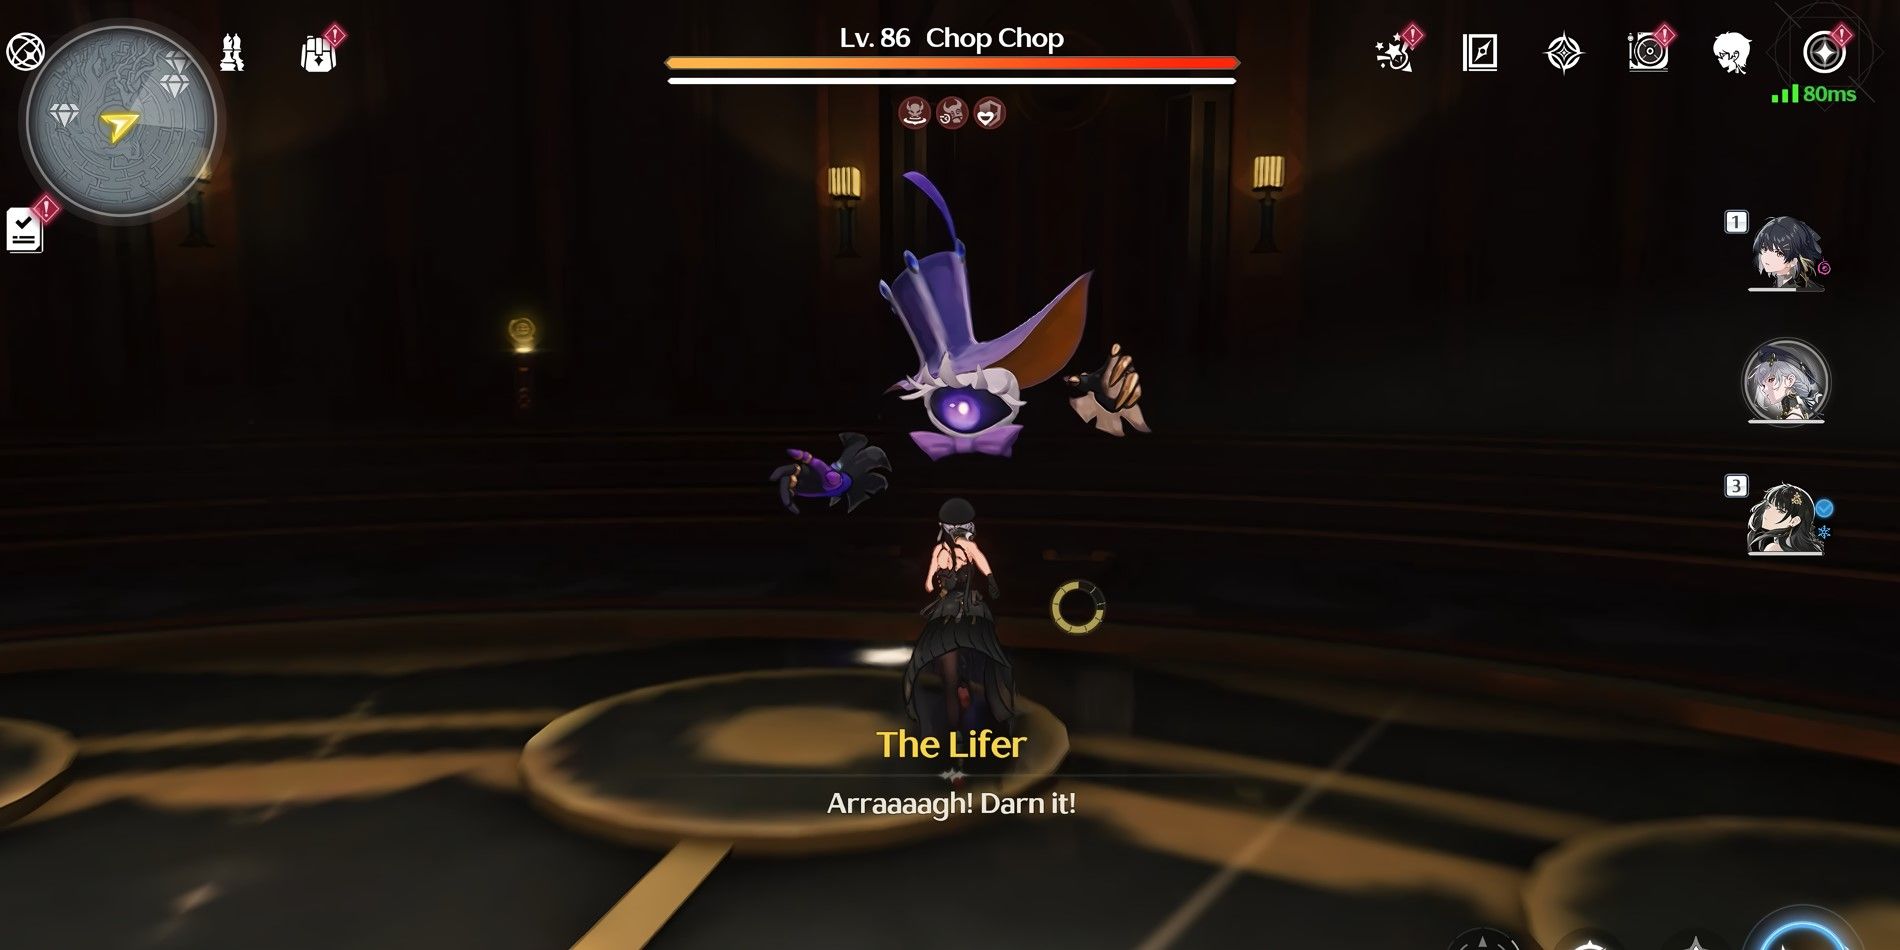
Wuthering Waves version 2.0 introduces the Rinascita region, filled with new Tacet Discords for players to encounter. Among these is the Chop Chop—a floating eyeball with a top hat accompanied by two hovering hands, resembling something straight from Alice's Adventures in Wonderland. While various types of Chop Chops roam Rinascita, a special variant known as the Lifer presents a significant challenge.
Players can find the Lifer at the center of the maze in Oakheart Highcourt, located within the Fagaceae Peninsula. This unique Chop Chop possesses multiple buffs that boost its durability and allow it to inflict massive damage. This guide details how players can remove many of the Lifer's buffs in Wuthering Waves, making the encounter significantly more manageable.
How to Defeat the Lifer
How to Find the Lifer
The Lifer resides in the central chamber of the Oakheart Highcourt maze, directly beneath the massive tree roots. However, not every entrance to this area is accessible from the start. One open entrance is on the southwest side, facing the direction of the Resonance Beacon near Oakheart Highcourt. Players can scale the walls from this direction or use the Flight function to simply fly over the maze walls.
The Lifer Board Game
Inside, players will discover the Lifer next to a large board game featuring six pieces. The objective is to connect three pieces in a row before the Lifer does. Players control the black pieces, while the Lifer uses the white ones. Crucially, the board game affects the actual walls and gates of the Oakheart Highcourt maze based on where you place your black pieces. Placing a black piece on the board's outer ring will open all the walls and gates in that corresponding direction. Players can leave the board game at any time, and all piece positions will be saved.
Although challenging the Lifer directly is optional, completing the board game is essential for removing its buffs. We do not recommend winning the game before removing these buffs, as doing so will trigger combat immediately.
How to Remove the Lifer's Buffs
The Lifer has seven buffs that make it an extremely tough opponent without a well-invested team. Four of these buffs can be removed using an item called the Stake of Imbalance, while the remaining three are permanent. Players can inspect these buffs via the glowing yellow module located directly behind the Lifer.
Removable Buffs (Fragility):
- Growing Loneliness: The Lifer recovers 10% of its maximum HP per second after not being attacked for over 2 seconds.
- Desire for Escape: Increases the Lifer's ATK by 25%. The damage dealt by the Lifer is further increased by an additional 25% every 20 seconds.
- Impending Stalemate: Boosts the Lifer's ATK by 20% each time it deals damage, stacking up to 4 times. If the Lifer deals no damage within 6 seconds, all stacks are lost.
- Decay of Time: The Lifer gains 200% resistance to Glacio, Fusion, Electro, Aero, Spectro, and Havoc damage. Its maximum HP is also increased by 25%.
Permanent Buffs (Stability):
- Chains of Confinement: The Lifer is immune to interruption when its HP is above 50%.
- Endless Game: Reduces the duration of the Lifer's immobilization state by 50%.
- Divine Garden: When the Lifer takes damage exceeding 25% of its max HP from a single hit, it repels all nearby enemies and damages them.
To find the Stake of Imbalance items, use the Sensor utility near the Lifer to reveal four purple lines pointing toward their locations. These trails lead to four separate rooms on the maze's outer ring. To reach each room, players must use the board game to position black pieces in the direction of the rooms, which opens the corresponding walls and gates.
The game pieces will keep their positions after you exit, so you can focus on opening each room one at a time.
Once a gate is open, follow the path to the room at its end, where you'll find a winged statue. Two of these rooms require defeating Tacet Discords, one involves destroying Friable Rocks, and the final Stake of Imbalance is simply resting on a table. Each Stake emits a soft white glow, making them easy to locate and collect.
After obtaining a Stake of Imbalance, insert it into the module in front of the corresponding statue to remove one of the Lifer's buffs. Once a buff is removed, the corresponding purple line seen through the Sensor will turn yellow.
Defeating the Lifer
Once all four removable buffs have been stripped away, players can return to face the Lifer on much fairer terms. You can either win the board game or select "Fight it out!" from the chair to start the battle. Without its key buffs, the Lifer is only slightly tougher than a regular wild Chop Chop. Its attacks—whether punches, grabs, or spins—pose little threat and deal minimal damage.
Your first victory over the Lifer rewards a Premium Supply Chest. A second win grants another Premium Supply Chest plus three Basic Supply Chests. A third and final victory yields an Advanced Supply Chest and three Standard Supply Chests.
Players can re-enable the buffs by interacting with the same four modules, offering a greater challenge. However, no achievements are tied to defeating the Lifer with all of its buffs active.
The Lifer Achievements
In addition to the chests, players can earn four unique achievements related to the Lifer and its board game.
- The Lifer's Salvation: Defeat the Lifer in Oakheart Highcourt.
- The Ring of The Lifer: Claim all treasures protected by the Lifer
- Defeat him three times to obtain all nine chests
- Limit of Intelligence: Defeat the Lifer in the board game at Oakheart Highcourt.
- Alpha Go: Lose to the Lifer 10 times in the board game at Oakheart Highcourt.
If you're having trouble beating the Lifer in the board game, focus on blocking its attempts to form a line. Eventually, the Lifer will grow impatient and make a clear mistake, which you can take advantage of.
Latest Articles
James Gunn Dismisses Fan Wars Ahead of Superman, Fantastic Four Releases
This summer, two major superhero films are primed for a box office showdown. The DC Universe's rebooted Superman arrives on July 11, followed by the Marvel Cinematic Universe's colossal The Fantastic Four: First Steps a mere two weeks later on July 2

New Fast-Paced Puzzle Game 'Is This Yours?' Released by Cessabit Creators
Tepes Ovidiu, an indie developer from Romania, has launched a fresh puzzle game. His earlier titles include Cessabit, a memory game, and Not Chess. Is This Yours? is his latest creation, putting you in charge of a wildly disorganized lost & found cou
Tom Hardy Demands Oscar for Stunt Actors
Following the Academy's announcement that it will finally introduce an Oscar for Stunt Design, actor Tom Hardy has questioned whether a single award category is sufficient.In an interview with IGN ahead of the release of his new film, Havoc, Hardy sh
Explore a Mysterious World Powered by Your Movement in Monster Walk: Step Adventure, Out Now
Talofa Games, the creators of the acclaimed Run Legends, has officially released its latest mobile title. Although Monster Walk: Step Adventure entered early access in mid-July, it is now fully launching across Europe and the United States.The game

Pokémon TCG Pocket Launches Ultra Beast Event
The latest Mass Outbreak event is now live in Pokémon TCG PocketUltra Beasts are back in the spotlight once againFinish challenges or use Wonder Pick to acquire missing cards or discover new onesFor Pokémon Trading Card Game Pocket enthusiasts, the r

Sailor Cats 2 Joins Crunchyroll
Explore the cosmos to discover adorable feline companionsEnjoy charming mini-games for a dose of pure delightRemember to care for your kitties with pets and treatsIf one thing never fails to brighten my day on mobile, it's the heartwarming joy of who
Latest Games

Hitomi's Sick Pleasure
Casual丨597.60M

Vow Me, Faeries
Casual丨855.20M

Idle World - Build The Planet
Puzzle丨131.70M

Slot Book 777
Card丨28.10M


Trending Games
MORE +


Top News
MORE +


01
01-01
Call of Duty: Black Ops 6 Adds Fan-Favorite Modes
Call of Duty: Black Ops 6 receives classic game modes and map updates this week, addressing post-launch issues. The highly anticipated "Infected" mode arrives tomorrow, followed by the iconic "Nuketown" map on Friday, November 1st.
Infected and Nuketown Enhance Black Ops 6
Treyarch, the developer,
02
03-13
Top 10 LitRPG Books for 2025
Reading is my absolute favorite pastime. While I enjoy video games and TV, nothing quite compares to immersing myself in a captivating book series. My reading journey began with Harry Potter, branching out to sci-fi, fantasy, mysteries, and even some non-fiction. But my true literary passion ignite
03
04-08
Kingshot Beginner's Guide: Mastering Tower Defense Mechanics
Dive into the thrilling world of Kingshot, a multiplayer strategy game that masterfully combines precision shooting with tactical warfare. Set against the backdrop of a medieval fantasy realm, you step into the shoes of a powerful monarch, locked in a fierce struggle for supremacy over rival kingdom
04
03-05
Helldivers 2: Superstore Rotation (All Armor & Items)
Helldivers 2 Superstore: A Complete Guide to Armor and Item Rotations
Equipping the right armor is crucial in Helldivers 2. With diverse armor types (light, medium, heavy), unique passives, and varying stats, choosing your gear is a strategic decision. The Superstore offers exclusive armor sets an
05
04-26
Delta Force: Comprehensive Guide to All Combat Maps
Delta Force, the much-anticipated mobile shooter, is set to hit the mobile gaming scene this April. As the release date approaches, it's the perfect moment to familiarize new players with the diverse combat maps that await them. The game features four core maps: Zero Dam, Layali Grove, Brakkesh, and
Topics
More +