
Application Description
Mastering Google Chrome's Built-in Translation: A Comprehensive Guide
This guide provides a step-by-step walkthrough on efficiently translating web pages using Google Chrome's integrated translation features, covering whole-page translation, selected text translation, and personalized settings adjustments. By following these instructions, you can seamlessly navigate multilingual websites.
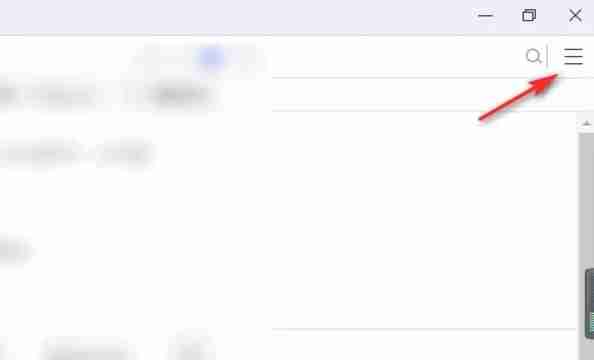
Step 1: Accessing the Settings Menu
Locate and click the Chrome menu icon (usually three vertical dots or three horizontal lines) in the upper right corner of your browser window.
Step 2: Navigating to Settings
In the dropdown menu, select the "Settings" option. This will open Chrome's settings page.

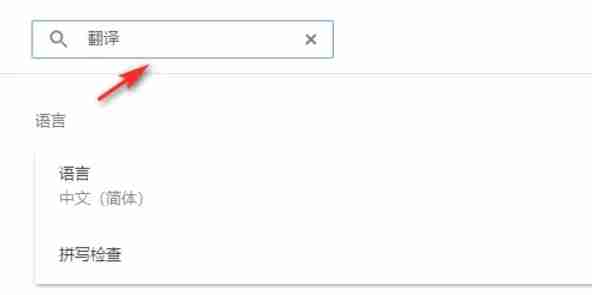
Step 3: Locating Translation Settings
At the top of the settings page, utilize the search bar. Enter "Translate" or "Language" to quickly find the relevant settings.
Step 4: Accessing Language Settings
Once the search results appear, locate and click the "Languages" or "Translation" option.
Step 5: Managing Languages
Within the language settings, you'll find a dropdown menu displaying supported languages. Click the "Add languages" button or review your existing language list.

Step 6: Enabling Automatic Translation
Crucially, ensure the option "Offer to translate pages that aren't in a language you read" is enabled. This will prompt Chrome to automatically offer translation for pages in languages other than your default browser language.
By following these steps, you can leverage Google Chrome's powerful translation capabilities for a smoother, more efficient multilingual browsing experience.
Screenshot


Reviews
Post Comments
Latest Articles
Chadwick Boseman to Receive Hollywood Walk of Fame Star This Month
Chadwick Boseman, the acclaimed actor recognized for his role as T'Challa in the MCU, will be honored with a posthumous star on the Hollywood Walk of Fame on November 20, according to the Hollywood Chamber of Commerce.This update is shared by Variety

Hasbro Debuts Savage Land Marvel Legends at Comic-Con
Hasbro unveils an exclusive Marvel Legends set for San Diego Comic-Con 2025 that will delight '90s X-Men enthusiasts. The Marvel Legends Series: Gamerverse Marvel Snap Savage Land 3-Pack introduces all-new renditions of beloved heroines Rogue and Sha

Rockstar Launches Bully Anniversary Update
Rockstar Games has surprised fans with an Anniversary Edition update for the mobile version of Bully – the first patch in six years. The update brings improvements exclusively to Android and iOS versions, with no changes for console or PC players
Michael Bay, Sydney Sweeney Team for 'OutRun' Film
Sega's beloved arcade racing game, OutRun, is unexpectedly getting a film adaptation, with Michael Bay and Sydney Sweeney confirmed to be involved.According to The Hollywood Reporter, Universal Pictures has tapped Transformers director Michael Bay to
Hit Superhero Comedy Dispatch Will Soon No Longer Be PlayStation Console Exclusive
Superhero workplace comedy game Dispatch has just landed on the Nintendo eShop for Switch and Switch 2, and is now available to pre-order.
There’s been no official statement from developer AdHoc Studio yet, but the Nintendo eShop listing is live in A

Paradise Release Date Announced
Is Paradise Coming to Xbox Game Pass?Paradise won't be launching on Xbox platforms, making its inclusion in Xbox Game Pass impossible. Players looking forward to this title will need to explore playstation or pc gaming options instead.
Apps like GSMNeo FRP

Stop Motion Video
Tools丨23.30M

Hawaiian language pack
Tools丨2.70M

Porn Blocker: Safe Search
Tools丨18.90M

WaLog: Online Tracker
Tools丨12.40M

مقاطع مضحكة
Tools丨37.60M

Booze Events
Tools丨9.20M


Ghost Hunting Tools
Tools丨53.80M

One Key: password manager
Tools丨21.60M
Latest Apps

APCOA FLOW
Auto & Vehicles丨62.1 MB


MotorSim 2
Auto & Vehicles丨4.5 MB

Remote Park
Auto & Vehicles丨20.3 MB

mowiz TRUCK
Auto & Vehicles丨58.4 MB

Pion Smart Charger
Auto & Vehicles丨17.4 MB
Newmar
Auto & Vehicles丨67.6 MB

Дилижанс НН
Auto & Vehicles丨20.0 MB

Loading Master
Auto & Vehicles丨47.2 MB
Trending Apps
MORE +


Top News
MORE +

01
01-01
Call of Duty: Black Ops 6 Adds Fan-Favorite Modes
Call of Duty: Black Ops 6 receives classic game modes and map updates this week, addressing post-launch issues. The highly anticipated "Infected" mode arrives tomorrow, followed by the iconic "Nuketown" map on Friday, November 1st.
Infected and Nuketown Enhance Black Ops 6
Treyarch, the developer,
02
03-13
Top 10 LitRPG Books for 2025
Reading is my absolute favorite pastime. While I enjoy video games and TV, nothing quite compares to immersing myself in a captivating book series. My reading journey began with Harry Potter, branching out to sci-fi, fantasy, mysteries, and even some non-fiction. But my true literary passion ignite
03
04-08
Kingshot Beginner's Guide: Mastering Tower Defense Mechanics
Dive into the thrilling world of Kingshot, a multiplayer strategy game that masterfully combines precision shooting with tactical warfare. Set against the backdrop of a medieval fantasy realm, you step into the shoes of a powerful monarch, locked in a fierce struggle for supremacy over rival kingdom
04
03-05
Helldivers 2: Superstore Rotation (All Armor & Items)
Helldivers 2 Superstore: A Complete Guide to Armor and Item Rotations
Equipping the right armor is crucial in Helldivers 2. With diverse armor types (light, medium, heavy), unique passives, and varying stats, choosing your gear is a strategic decision. The Superstore offers exclusive armor sets an
05
04-26
Delta Force: Comprehensive Guide to All Combat Maps
Delta Force, the much-anticipated mobile shooter, is set to hit the mobile gaming scene this April. As the release date approaches, it's the perfect moment to familiarize new players with the diverse combat maps that await them. The game features four core maps: Zero Dam, Layali Grove, Brakkesh, and
Topics
More +