Phasmophobia: Unlock All Achievements & Trophies Guide
Author : Ethan
Apr 22,2025
If you're a ghost hunter extraordinaire in *Phasmophobia*, you'll be thrilled to know that the game offers a wealth of achievements and trophies to test your prowess. Here's your comprehensive guide on how to unlock all achievements in *Phasmophobia*.
How to Unlock All Achievements in Phasmophobia
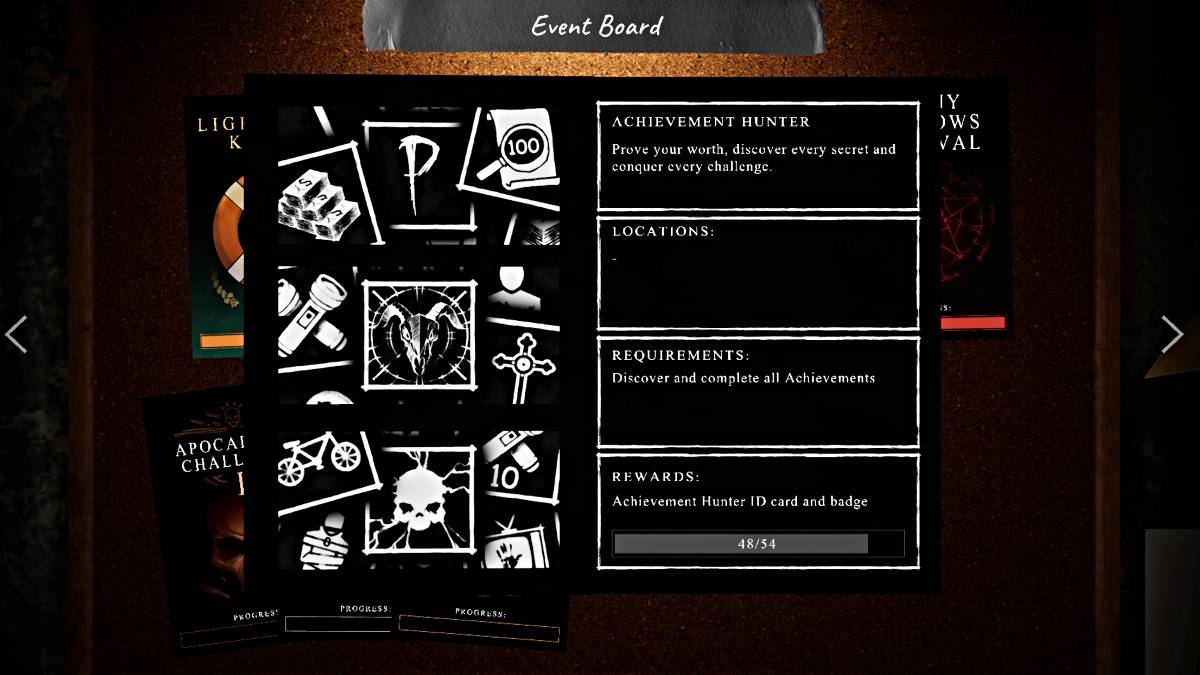
*Phasmophobia* boasts a total of 54 achievements, and for PlayStation 5 players, an additional Platinum trophy, summing up to 55 trophies. These can be unlocked by mastering various aspects of the game, from completing training to conquering the toughest challenges. Earning them all not only showcases your skill but also rewards you with the prestigious Achievement Hunter ID Card and Badge for your character.
While some achievements demand specific strategies, the most effective way to unlock many of them is by teaming up with friends. Collaborating can speed up equipment setup, provide second opinions on ghost identification, and trigger the ghost behaviors needed for certain achievements.
Below, you'll find a detailed list of all current achievements in the game, along with the best tips to unlock each one:
| Achievement/Trophy | How to Unlock |
|---|---|
| No More Training Wheels | **Complete training** Navigate to the 'Training' tab in the Main Menu and complete each step of the process until you reach the end. |
| Rookie | **Complete 10 Contracts** Complete each contract by selecting a map, entering the location, circling a ghost on the list, and leaving by closing the van. Your guess does not need to be correct for completion. |
| Professional | **Complete 50 Contracts** Follow the same steps as for the Rookie achievement, but complete 50 contracts. |
| Boss | **Complete 100 Contracts** Follow the same steps as for the Rookie and Professional achievements, but complete 100 contracts. |
| Extra Mile | **Complete 50 optional objectives** Optional objectives are available when starting a contract. Complete up to three per contract, marked by red checkmarks upon fulfillment. |
| Dedicated | **Complete 30 daily tasks** Access daily tasks from the Main Menu, which refresh every 24 hours. Complete the required activities to fulfill each task. |
| Devoted | **Complete 10 weekly tasks** Weekly tasks are listed on the Main Menu and refresh every 7 days on Sunday. Complete the required activities to fulfill each task. |
| Challenger Approaching | **Complete a Weekly Challenge Mode** Challenge Mode offers a unique contract each week with a preset loadout and specific ghost behavior. Complete it 3 times within the same week to unlock this achievement and earn the full $5,000 reward. |
| Rise to the Challenge | **Complete the Weekly Challenge Mode 5 Times** Follow the same steps as for the Challenger Approaching achievement, but complete it 5 times. |
| Taking All Challenges | **Complete the Weekly Challenge Mode 10 Times** Follow the same steps as for the Challenger Approaching and Rise to the Challenge achievements, but complete it 10 times. |
| Chump Change | **Spend $1** After earning money from contracts, spend it on the Equipment Manager screen to the right of the dashboard. |
| Fat Stack | **Spend $10,000** Spend $10,000 on the Equipment Manager screen after earning money from contracts. |
| Cash Cow | **Spend $50,000** Spend $50,000 on the Equipment Manager screen after earning money from contracts. |
| Break The Bank | **Spend $100,000** Spend $100,000 on the Equipment Manager screen after earning money from contracts. |
| Bare Essentials | **Unlock all tier one equipment** As you level up by completing contracts and earning money, spend it to unlock all tier one equipment at Level 16. |
| Tools of the Trade | **Unlock all tier two equipment** Continue leveling up and spend money to upgrade all equipment to tier two at Level 49. |
| Fully Loaded | **Unlock all tier three equipment** Reach Level 90 and upgrade all equipment to tier three to unlock this achievement. |
| Director | **Create a custom difficulty** Go to the 'Difficulty' setting under 'Choose a Contract' in the Main Menu, select 'Custom', customize your settings, and click 'Apply'. |
| Bronze Hunter | **Obtain the Bronze Apocalypse Trophy** Create a custom difficulty in Singleplayer for Sunny Meadows Institution, and during the contract, complete all 3 optional objectives, take a ghost photo (1-3 stars), correctly identify the ghost type, and survive. The default 'Insanity' difficulty can also unlock the bronze trophy. |
| Silver Hunter | **Obtain the Silver Apocalypse Trophy** Follow the same steps as for the Bronze Hunter achievement but on a higher difficulty setting. |
| Gold Hunter | **Obtain the Gold Apocalypse Trophy** Follow the same steps as for the Bronze and Silver Hunter achievements but on the highest difficulty setting. Completing Gold first will automatically unlock Bronze and Silver trophies. |
| Banshee Discovered | **Successfully identify your first Banshee and survive** Banshee evidence includes Ultraviolet, Ghost Orbs, and DOTs. They scream into the Parabolic Microphone, target individual players, and sing during ghost events. |
| Demon Discovered | **Successfully identify your first Demon and survive** Demon evidence includes Ultraviolet, Ghost Writing, and Freezing Temperatures. They can hunt every 20 seconds and at any sanity level. |
| Deogen Discovered | **Successfully identify your first Deogen and survive** Deogen evidence includes Spirit Box, Ghost Writing, and DOTs. They are known for heavy breathing in the Parabolic Microphone. |
| Goryo Discovered | **Successfully identify your first Goryo and survive** Goryo evidence includes EMF5, Ultraviolet, and DOTs. They don't move far from their favorite room during hunts. |
| Hantu Discovered | **Successfully identify your first Hantu and survive** Hantu evidence includes Ultraviolet, Ghost Orbs, and Freezing Temperatures. They move faster in colder temperatures and can't turn on the breaker. |
| Jinn Discovered | **Successfully identify your first Jinn and survive** Jinn evidence includes EMF5, Ultraviolet, and Freezing Temperatures. They can't turn off the breaker and are faster during hunts while it's on. |
| Mare Discovered | **Successfully identify your first Mare and survive** Mare evidence includes Spirit Box, Ghost Orbs, and Ghost Writing. They wander to rooms with lights off and quickly turn off or blow out lights. |
| Moroi Discovered | **Successfully identify your first Moroi and survive** Moroi evidence includes Spirit Box, Ghost Writing, and Freezing Temperatures. They can place a curse that depletes sanity quicker when heard through a Spirit Box or Parabolic Microphone. |
| Myling Discovered | **Successfully identify your first Myling and survive** Myling evidence includes EMF5, Ultraviolet, and Ghost Writing. They are difficult to detect by sound from further away. |
| Obake Discovered | **Successfully identify your first Obake and survive** Obake evidence includes EMF5, Ultraviolet, and Ghost Orbs. They have abnormal ultraviolet prints and change ghost models during hunts. |
| Oni Discovered | **Successfully identify your first Oni and survive** Oni evidence includes EMF5, Freezing Temperatures, and DOTs. They drain extra sanity during ghost events and are more visible during hunts. |
| Onryo Discovered | **Successfully identify your first Onryo and survive** Onryo evidence includes Spirit Box, Ghost Orbs, and Freezing Temperatures. They can be tested by lighting three Firelights in their favorite room; they will extinguish all three lights and trigger a hunt. |
| Phantom Discovered | **Successfully identify your first Phantom and survive** Phantom evidence includes Spirit Box, Ultraviolet, and DOTs. They are not visible in photos taken by the player. |
| Poltergeist Discovered | **Successfully identify your first Poltergeist and survive** Poltergeist evidence includes Spirit Box, Ultraviolet, and Ghost Writing. They excessively throw debris further than other ghosts. |
| Raiju Discovered | **Successfully identify your first Raiju and survive** Raiju evidence includes EMF5, Ghost Orbs, and DOTs. They hunt at higher sanity levels and move faster near electronic equipment. |
| Revenant Discovered | **Successfully identify your first Revenant and survive** Revenant evidence includes Ghost Orbs, Ghost Writing, and Freezing Temperatures. They move slowly until they detect a player. |
| Shade Discovered | **Successfully identify your first Shade and survive** Shade evidence includes EMF5, Ghost Writing, and Freezing Temperatures. They don't hunt or event if the player is in their favorite room. |
| Spirit Discovered | **Successfully identify your first Spirit and survive** Spirit evidence includes EMF5, Spirit Box, and Ghost Writing. They have a longer cooldown when Incensed. |
| Thaye Discovered | **Successfully identify your first Thaye and survive** Thaye evidence includes Ghost Orbs, Ghost Writing, and DOTs. Their ghost model 'ages' as the player's sanity drops. |
| The Mimic Discovered | **Successfully identify your first Mimic and survive** Mimic evidence includes Spirit Box, Ultraviolet, Freezing Temperatures, and Ghost Orbs. They have four pieces of evidence and change ghost behavior. |
| The Twins Discovered | **Successfully identify your first Twins and survive** Twins evidence includes EMF5, Spirit Box, and Freezing Temperatures. They show double ghost activities and hunt at two different speeds. |
| Wraith Discovered | **Successfully identify your first Wraith and survive** Wraith evidence includes EMF5, Spirit Box, and DOTs. They do not interact with any tier of salt placed by the player. |
| Yokai Discovered | **Successfully identify your first Yokai and survive** Yokai evidence includes Spirit Box, Ghost Orbs, and DOTs. They have stronger player audio detection and can hunt at up to 80% sanity when the player is in their room. |
| Yurei Discovered | **Successfully identify your first Yurei and survive** Yurei evidence includes Ghost Orbs, Freezing Temperatures, and DOTs. They frequently interact with doors and can close the entrance door outside of hunts and events. |
| I | **Reach Prestige I** Upon reaching Level 100, choose to 'Prestige' via the Main Menu. Be aware that your level and equipment will reset upon prestiging. |
| II | **Reach Prestige II** Upon reaching Level 100 after Prestige I, choose to 'Prestige' again. Your level and equipment will reset. |
| III | **Reach Prestige III** Upon reaching Level 100 after Prestige II, choose to 'Prestige' once more. Your level and equipment will reset. |
| Work Experience (Hidden) | **Complete your first contract** In either Singleplayer or Multiplayer, complete a contract by selecting a ghost from the list in your Journal and leaving the map by closing the van. Do not select 'Leave Game' in the Journal. |
| Flawless Execution (Hidden) | **Complete a perfect investigation** During a contract, complete all three optional objectives, take nine 3-star photos, collect the bone from the map, and guess the ghost's identity correctly. |
| They're Here (Hidden) | **Witness a Poltergeist ability** Poltergeists can throw multiple objects if grouped together. Gather various items and place them in a pile in the ghost's location to trigger this ability. |
| Escape Artist (Hidden) | **Escape a Revenant** Successfully escape a Revenant during a hunt, preferably using tier 2 or 3 Incense to stall the ghost while you escape. |
| The Bait (Hidden) | **Get killed by a Banshee in multiplayer** In a group, correctly identify a Banshee, lower your sanity, and wait in the ghost's location for a hunt. |
| Doom Slayed (Hidden) | **Get killed by a Demon ability within the first minute** Demons can hunt at any sanity level and may hunt as soon as you enter the map. This achievement largely depends on luck. |
| Paranormal Perfectionist (PS5 Platinum Trophy) | Obtain all trophies |
That concludes our guide on how to unlock all achievements in *Phasmophobia*. For the latest guides and news on the game, including the *Phasmophobia* No Evidence Cheat Sheet, make sure to visit The Escapist.
*Phasmophobia is available now on PlayStation, Xbox, and PC.*
Latest Articles
"Star Wars Outlaws: A Tribute to Hondo Ohnaka's Pirate Legacy"
Star Wars Outlaws received its first story expansion today with the launch of the A Pirate’s Fortune DLC on PlayStation, Xbox, and PC—and fans owe it all to one clever scoundrel: Hondo Ohnaka.According to Drew Rechner, Creative Director at Ubisoft’s
Wuthering Waves 2.1 Phase II: New Banners Detailed
Wuthering Waves launches Phase II of its Version 2.1 update on March 6th, packed with new events, Resonator and weapon banners, and plenty of rewards to claim. Here's everything you need to know.What’s Happening?The companion story "Sail Day, Captain
Rian Johnson Reveals He Never Made an Outline or Treatment For His Star Wars Trilogy: 'All Very Conceptual'
You're absolutely right — Rian Johnson’s potential Star Wars trilogy was one of the most tantalizing "what ifs" in modern sci-fi fandom. The idea of Johnson, the mastermind behind Knives Out and a filmmaker deeply committed to emotional storytelling,
Android Release for RPG Miscrits: World of Creatures
Miscrits: World of Creatures, the beloved social monster-collecting game from the 2010s, has launched on Android by Lightning Ball Studios. Originally a browser-based hit from Broken Bulb Studios before its 2017 closure, the game has been completely
Alolan Mon Debuts in Pokémon TCG Pocket
Pokémon TCG Pocket is officially launching its Celestial Guardians expansion this month. The global release is set for April 30th, 2025, transporting players to the Alola region where they’ll explore beneath its radiant Sun and shimmering Moon.
What

Woochi the Wayfarer Preorder and DLC
Woochi the Wayfarer takes place in a fantasy reimagining of Korea’s Joseon era. Discover how to pre-order the game, its pricing, and whether any special editions or downloadable content are planned.
← Return to Woochi the Wayfarer main articleWoochi
Latest Games

True Football 3
Sports丨35.9 MB

Virtual Pet Tommy - Cat Game
Puzzle丨112.81M

Кто из нас?
Trivia丨13.6 MB

Squad Alpha - Action Shooting
Action丨598.77M

Return to the Cabin
Casual丨476.90M

Classic American Muscle Cars 2
Racing丨84.8 MB


Word Bubble
Word丨30.4 MB
Trending Games
MORE +


Top News
MORE +
01
01-01
Call of Duty: Black Ops 6 Adds Fan-Favorite Modes
Call of Duty: Black Ops 6 receives classic game modes and map updates this week, addressing post-launch issues. The highly anticipated "Infected" mode arrives tomorrow, followed by the iconic "Nuketown" map on Friday, November 1st.
Infected and Nuketown Enhance Black Ops 6
Treyarch, the developer,
02
03-13
Top 10 LitRPG Books for 2025
Reading is my absolute favorite pastime. While I enjoy video games and TV, nothing quite compares to immersing myself in a captivating book series. My reading journey began with Harry Potter, branching out to sci-fi, fantasy, mysteries, and even some non-fiction. But my true literary passion ignite
03
04-08
Kingshot Beginner's Guide: Mastering Tower Defense Mechanics
Dive into the thrilling world of Kingshot, a multiplayer strategy game that masterfully combines precision shooting with tactical warfare. Set against the backdrop of a medieval fantasy realm, you step into the shoes of a powerful monarch, locked in a fierce struggle for supremacy over rival kingdom
04
03-05
Helldivers 2: Superstore Rotation (All Armor & Items)
Helldivers 2 Superstore: A Complete Guide to Armor and Item Rotations
Equipping the right armor is crucial in Helldivers 2. With diverse armor types (light, medium, heavy), unique passives, and varying stats, choosing your gear is a strategic decision. The Superstore offers exclusive armor sets an
05
04-16
Azure Latch Codes (March 2025)
Last updated on March 28, 2025 - Added new Azure Latch codes!Are you looking to boost your in-game cash to splurge on animations, styles, emotes, and more in Azure Latch? Look no further. Here, you'll discover all the latest working codes for the game. Don't delay—redeem them quickly and enjoy that
Topics
More +